Sunday, October 26, 2008

D I W A L I G R E E T I N G S ..............

Wishing all the readers of As Dear As Salt a very Happy and Joyous Diwali...........
.
.
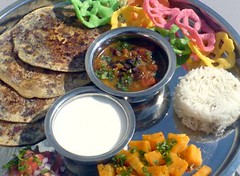
Here are a few snacks/dishes that you may like to try this festive season......
.

Dates and Pistachio Poli
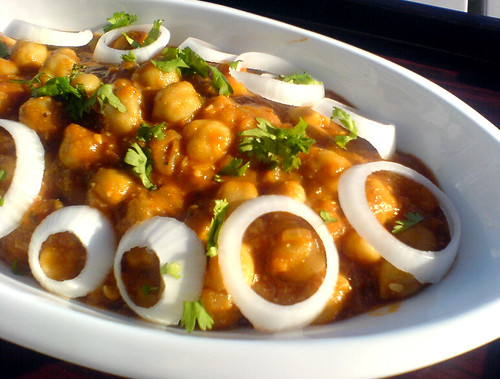
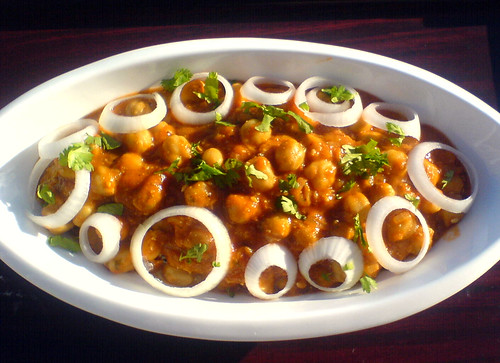
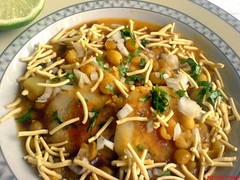
Ragada Patties


Badam no Seero


Sweet Potato Paratha

Matthi Puri


See you all after a short break!

Tuesday, September 9, 2008

Glimpses of St. Helena's farmers Market, Napa AND Zuke-A-mole

He is the King and he did it again!

Heartiest Congratulations to Roger Federer who took home the US Open trophy for the 5th consecutive time! What a beauty and pure joy it is to watch him play. The best player ever to play the game of tennis, IMO. Always a class act and ever so generous with all these great achievements, the sign of a true champion!!

Coming back to today's post, here are some pictures from my recent trip to Napa Valley, food related of course ;) I managed to convince all in my group to spare some time and go visit the popular St. Helena's farmers market out there. It was a beautiful bright day and we did pick up quite a few things from there. From the lovely produce of fresh fruits and vegetables, to various flavored honeys, to all kinds of pesto's possible, to handmade scarves, to fine crafted soaps, to indoor plants, they seemed to have it all! I happened to leave some pesto and jalapeno relish jars in my handbag and had to leave it at the airport :( Anyway, I'm very happy with my other purchases from there including the mega white peaches ;)


Let me leave you with the recipe of Zuke-A-mole, a smart twist to the ever popular guacamole using Zucchini which I've adapted from here. Made it a few times and it is one tasty dip! I've tried it with bread, idli's and makes a good accompaniment to desi meals as well.


Zuke-A-mole

3 Zucchini
1 sweet onion chopped
2-3 green chili, as per taste
2-3 garlic cloves, chopped
1/2 cup coriander leaves
1/4 cup mint leaves or basil leaves (can make without it as well)
salt & pepper to taste
1-2 tbsp oil
2tbsp lemon juice, as per taste

1. Heat oil. Add onion, green chili and garlic, saute 2 minutes.

2. Add chopped zucchini and cook till done.

3. Add salt & pepper, coriander leaves, mint leaves and switch off the gas. Add lemon juice. Cool and blend smooth.

4. Enjoy this tasty dip as you would any other dip. The original recipe asks for roasting of zucchini and onion in an oven for 90mins, that will definitely bring about an intense flavor, but is quite time consuming for me! I thoroughly enjoyed this take on the ever favorite guacamole.

Tuesday, July 22, 2008

Grilled Vegetable (Eggplant, Zucchini & Onion) Panini with Pesto - GYO 2008

Sandwiches in any form, grilled or otherwise, make for such tasty complete meals when paired with the right sides. I think I can have them everyday, albeit with slight variations. But, there was this one time a while back, when due to circumstances beyond my control, I ended up having grilled cheese sandwich for 12 straight days for all the meals! Though the vendor took pity on me and threw in a tomato slice once in a while, I was off sandwiches of any kind for a long time. I think it would have been OK If I had some variables in there, but to have the exact same thing day in day out was not too exciting to say the least!


Having harvested a few eggplants, fresh from my kitchen garden, I was thinking of ways to use it without drowning it in spices of any kind. Eggplant & Zucchini Panini is what I grilled that day!
.
Eggplant, Onion & Zucchini Panini (Grilled Veg Panini)
.

2 eggplants, thick sliced
2 Zucchini, thick sliced
1 onion, thick sliced
3 cloves garlic, finely chopped
8 bread slices, I use my favorite Jewish Rye Bread from the local bakery
1/2 cup pesto (you can use any kind, store bought is fine too, I used walnut-coriander pesto)
salt & pepper
thick sliced Mozzarella cheese
Olive oil for grilling the veg
Butter/Oil for grilling the Panini
.
1. Grill the vegetables till done.
This step can be done in an oven by layering the vegetables in a single layer on a baking sheet, drizzled with olive oil & chopped garlic at 400C OR
directly on the grill, use your preferred method of roasting the vegetables.
2. Now, it is time to get the Panini assembly line ready. Line up 4 slices of bread on your work area and slather pesto on them. Arrange roasted vegetables on top. Sprinkle salt & pepper. Arrange mozzarella slices and cover with the remaining slices of bread and grill till done. Use butter on the outside of bread for a great flavor.
The grill marks make for a pretty presentation. This can be done quickly in a Panini maker, but not having one does not stop you from making a Panini anytime. Just press down the bread with a heavy saucepan and you have yourself an make-do arrangement.
3. Enjoy the grilled veg panini with chips and a chilled smoothie ;) As you can see, this is more of a method rather than a recipe, lots of variations are possible here. Can be made without pesto, just slather some butter and lots of salt & pepper. Use whatever vegetables you have at hand.
.


This gorgeous panini with fresh eggplant from my beautiful garden makes it's way to GYO - 2008 guest hosted by Bee.
This fits right in with AWED-Italian hosted by DK.
I also want to send this to dear Sig for her MM-Grill it.
How can I resist sending this to Sia for WBB-Summer Feast.
that's it I guess ;)

Tuesday, July 15, 2008

Decadent Chocolate & Avocado Pate, Rice Bytes for MBP - Less is More


That I *love* avocado is not a secret with my foodie friends! Be it an appetiser, a soup, a salad, an entree or even a dessert, the lovely avocado knows how to shine through :) It is a must buy on my trips to the neighborhood grocery store, yeah I don't get it at my farmer's market here. It has all the good nutrients, including the good fats required for normal body functioning :) Yes, my mind is made up on the subject and will no longer be changing my dietary outlook based on reports that come out every 13 seconds! A lil' obsessed are we ;)

Anyway, when I saw this Decadent Chocolate & Avocado Pate I knew a trip to the store was in the immediate future ;)


Decadent Chocolate Avocado Pate
.
7oz / 1-1/4 cups fine quality dark chocolate chopped, I used 70%
1 Avocado
2 T maple syrup
1/4 cup orange juice, freshly squeezed
.
1. Melt chocolate along with maple syrup & orange juice to a nice smooth consistency. I did it in a microwave oven.
2. Add avocado and blend till smooth.
3. Line a bowl/pan with plastic wrap and pour the contents in it.
4. Chill in the refrigerator for an hour. Cover with plastic and then chill further overnight.
5. Next day invert it onto a plate and indulge in Choco-Avo Blisss :)

Can it be any simpler? I replicated Ricki's innovative recipe with just the omission of vanilla. For some strange reason I erred in my chocolate measurements, so i could taste the avocado, but i like it so no worries there. But if you make this do follow the measurements accurately, specially if you don't want to taste the avocado in the dish!


I also made Rice Bytes based on the talented Priya's recipe here. I liked the use of leftover rice to make this quick snack. These 'Bhaat na Muthiya' use basic ingredients like rice, besan and ground chili and they turned out so good! I used regular white rice instead of the brown rice ;)
This decadent pate & Rice Bytes with just four ingredients are off to Nupur's MBP-Less is More! Thank You Ricki & Priya for your lovely recipes.
.
.
What to do?
On another note I'm looking for some ideas from my foodie friends regarding cooking of Jasmine rice. For some strange reason I got a huge bag of Jasmine rice and am not sure how to use it. Who better than my talented chef friends to guide me in this regard :) Please, if you would leave your suggestions on how to cook Jasmine rice perfectly and what all can it be used for, including water measurements etc. Thank You dear friends, appreciate your input, what would I ever do without your guidance! Can you tell I'm a basmati junkie ;)

Monday, June 23, 2008

Catalan Chickpeas with Almonds and Tomatoes - Chole in a different Avataar?


First off, I would like to share this piece of good news with my dear friends! !
I just found out that Mascarpone Cheese is a health food* :) The article I just read mentioned that the calcium in this sweet cheese suppresses the release of calcitriol and parathyroid hormone which both inhibit the breakdown of fat.
So buddies, gorge away......;)
.
Feels good to be back with a chickpea recipe after a short break. I can never have enough chickpeas :) I'm forever looking for new ways to make chickpeas. My mom's chole of course remains my top favorite, but I don't mind experimenting with new recipes as well. On one such quest I chanced upon this beautiful creation of Melissa's, Catalan Chickpeas with Almonds and Tomatoes! Intrigued I was and the beautiful appetising picture made me want to try it even more. Here is my adapted version.
Catalan Chickpeas with Almonds and Tomatoes
1 heaped cup dry chickpeas soaked overnight
2T oil 1 onion finely chopped
1/2 cup tomato puree
a pinch sugar
a pinch saffron
3 garlic cloves chopped
1/3 cup almonds
2 T coriander/cilantro leaves
1.5 cups water
1 lime for the juice
salt, as per taste

1. Cook the soaked chickpeas till done. I pressure cook them, you may use your regular method or use canned as well.
2. Heat oil. Add chopped onion and saute till golden brown.
3. Add tomatoes, sugar and saute till it blends to form a paste. Melissa mentions that this is called 'sofregit' and is the base for many Catalan dishes.
4. Grind garlic, almonds, saffron & cilantro to a paste. I ground the almonds in a mixer first and then pounded all ingredients in a mortar/pestle.
5. Add the paste to the onion mixture along with cooked chickpeas and water.
6. Bring to a boil and simmer about 15 minutes till it forms a thick sauce.
7. Season with salt and lime juice as per taste.
8. As with many dishes, the flavor develops the longer it sits.
.
Notes:
1. I used the ingredients I had at hand. The original version calls for parsley, I substituted it with cilantro. Also, I used water instead of using stock.
2. This dish does not use any hot spices. For enjoying this dish on it's own use a lot of lime/lemon juice for a lovely flavor.
3. For serving it with naan/rice I added some chili powder and garam masala powder as well :)
I liked the addition of ground almonds & saffaron, makes it so rich and creamy.


My contribution to dear Sia's MBP-street food.
* - I just read the health claim on the net, to be taken with a pinch of salt....lol

On another happy note, I received a bagful of masala's from my dear friend Meera. What with kolhapuri masala, goda masala, malvani masala, the list is endless. I think I'm set for a loooooooong time :) Thank You, Meera, you are so very generous and kind, it was the best gift for a foodie like me ;)

Monday, June 2, 2008

Some Random Thoughts and Some Thank You's are in order....

The 'tick' incident in the household left everyone paranoid! After checking and re-checking the clothes in and out for the tenth time, it still did not feel safe enough to wear! All the talk about 'naturalism' went by the wayside and people were heard begging for the antibiotics real quick! Anyway, things are fine, thankfully :)
This did not leave me in much of a chatty frame of mind over the last few days, speaking of which, my dear friend Meera has passed on the 'Good Chat Blog' award to me and I'm very grateful to her for that! Many many Thanks to my dear friends Asha, Meera, Cham, Sukanya and Shrimathi for passing on the 'Make my day' award, means a whole lot to me :) Also a big thank you to dear Pravs for the 'E' award. Will proudly display these on the side bar and will be back soon :)
Don't mean to infringe upon your time, just be careful outdoors this summer my friends!

Monday, May 19, 2008

Almond, M A P L E and Cardamom 'Pots de Creme' (sugarless)


The brain was in overdrive, as it always is, in anticipation of creating new & exciting dishes :)
.
I was thinking 'Pots de Creme'! With such an appealing name it was not a tough choice at all. I managed to plug in all kinds of substitutions possible and the results were SWEET....and SMOOTH ;)
.
Pots de Creme refers to both the custard dessert as well as the small lidded pots that this dessert is served in. Pots de Creme or Pots-au-creme translates from French to English as 'pot of cream'. It is basically a kind of custard made with egg yolks and then baked in a bain marie/water bath. You may click on the link above for it's origin and some fancy shamancy pots collection ;)
.
Almond paste is what I thought of for the custard, having had a gorgeous experience with it sometime back. How about maple syrup take the place of sugar, cried out the forever sugar replacer in me. Now in my books, addition of cardamom/elaichi to any sweets makes it absolutely thrilling and takes it over the top, so that had to go in too :)
.
Almond, Maple and Cardamom Pots de Creme
.
2 cups milk
3/4 cup almonds soaked 3hrs, up to overnight
1/2 tsp ground cardamom/elaichi (use as per your taste)
4 tbsp maple syrup (use as per your liking, I do not like cloyingly sweet creations)
.
1. Bring milk to a boil and simmer for half an hour.
2. In the meanwhile blend soaked almonds(de-skin) to a fine paste, use milk to facilitate the blender.
3. Add the almond paste to the milk & cook a few minutes.
4. Add maple syrup and ground cardamom & switch off the gas in 5 minutes.
5. Pour into individual ramekins, cover with a foil and bake at 350 for 15-20 minutes till set. Covering the ramekins avoids a skin forming atop the milk.
6. Enjoy a healthy and sugar free dessert, we loved it :)
.
Notes:
If your milk mixture does not thicken well, you can add some thickener like arrowroot powder etc to help thicken it faster.
Maple syrup sweetens the dessert very well and has additional advantage of nutrients. As for the GI, you may check it's level if you have any problems in that field.
Almonds impart a beautiful nutty taste, you almost don't want to mask their taste with too much sweetness.Purists may not take swiftly to my using the name for this dessert, but since when has that stopped me ....lol
.
So, how do you use your maple syrup? do lemme' know in the comments section!
.

Tuesday, April 22, 2008

Raungi ki Rasewali Subzi - Black Eye Peas cooked in gravy & Earth Day


The smallest action is a million times better than the noblest of thoughts!

My little contribution towards mother nature for Earth Day, being celebrated today :)
I like to carry bags from home for quick shopping trips, this way I do not have to use plastic bags for the grocery etc. I got mine from TJ's at about $1.99 a piece.
I like to tear & use only the amount of paper towel needed for a cleanup rather than the whole sheet, no shame in that! I've gotten stares for that, truth be told I used to feel a bit embarrassed at first, now I pity those who stare ;)

I've set up my heater/AC such that it consumes least electricity during daytime by simple use of a regulator timer.
I hardly ever switch on the AC in my car, believe me our bodies can take a little heat....lol.
I try to avoid plastic cups/boxes whenever I can, glass/steel works the best.
I think it needs a little conscious planning, but once you get used to it, it's a breeze!

Please feel free to leave your tips in comments section, would like to learn more from you!
.

Now, lets look at the recipe of the day!


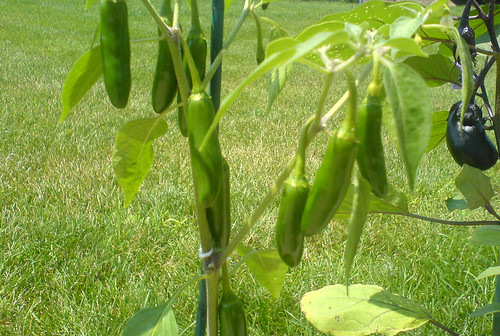
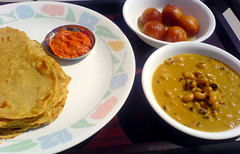
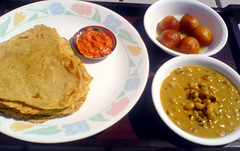
Raungi ki Rasewali Subzi - Black Eye Peas in gravy
.
1 cup raungi/lobia/black eye peas/chawli/karamani boiled
(I pressure cook it for 3 whistles, make sure it does not get mushy)
2 tbsp oil
1 tsp jeera/cumin seeds
a small piece of Cinnamon
1 dry red chili
1 medium onion finely chopped
2 big cloves garlic grated/paste
1" piece ginger grated/paste
1/2 tsp chili powder (as per taste)
1/4 tsp turmeric powder/haldi
1 tsp dhania powder/coriander seed powder
1/4 tsp garam masala pwd ( more if it is store bought)
1/2 cup yogurt OR 3 tbsp sour cream
salt to taste
.
1. Heat oil.
2. Add jeera, let splutter.
3. Add cinnamon, red chili and stir. Add finely chopped onion and saute till it turns brown.
4. Add ginger/garlic paste & saute till it gets incorporated in the onions.
5. Reduce heat, add all spices and stir a few seconds.
6. Add yogurt, little at a time and keep stirring well.
7. Add boiled raungi, salt and simmer on low for 10 minutes. Adjust consistency as per your taste.
8. Enjoy this healthy dish with rice or roti and maybe some Gulab Jamoon ;)

My contribution to Meeta's Monthly Mingle.
.

As we know, Taste Of India has been experiencing problems in receiving feeds, you can subscribe to my blog by clicking on the top left corner of this screen! This way you will not miss any of my posts!

A few other beany posts on my blog:

Double beans & Gujarati Kadhi

Black Eye Peas Patties

Tuesday, April 8, 2008

Carrot and Orange Soup


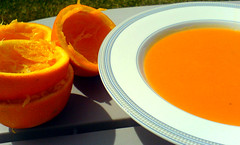
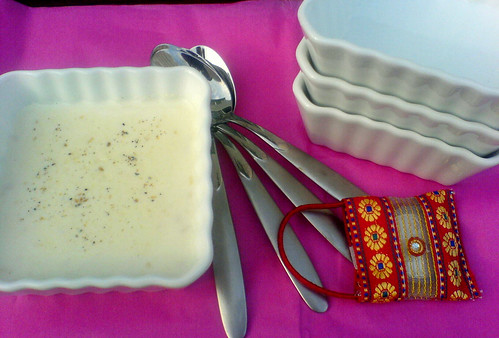
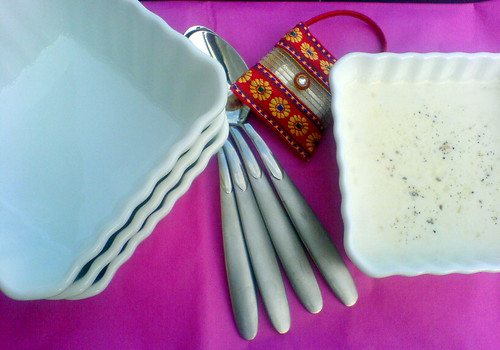
Musambi/Sweet Lime juice was my juice of choice in hostel days. Sipping a large glass of Musambi juice with hot & spicy pav bhaji, late at night was a ritual I looked forward to :) But tastes change! Now it is orange & carrot juice which has taken prime place in my kitchen, sometimes I add pineapple as well. Also, the fact that musambi is not available where I live, made me move on to oranges.

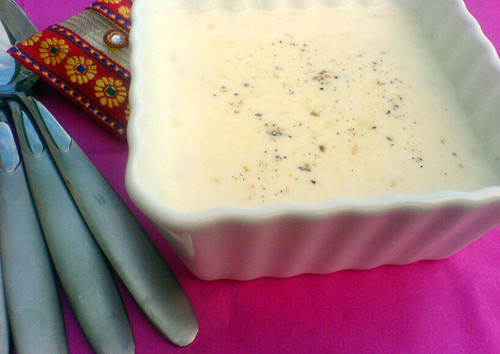
When I came across a soup made out of carrots & oranges, I was intrigued and decided to give it a try. It is a very straight forward recipe, use of the pressure cooker makes it ever so fast. I like it more on the orangey' side, you may adjust oranges and carrot quantities as per taste, it is quite flexible. I would not recommend making it with store bought juice from the cartons! It makes for one absolutely beautiful colored soup :)
.
Carrot and Orange Soup
.
2 large carrots, chopped
2 oranges squeezed to get juice
1 tbsp oil/butter
1 clove garlic, chopped
1 small onion chopped
2.5 cups water
salt & pepper to taste
.
1. Heat oil/butter.
2. Add onion, garlic & carrots. Saute till they soften a bit.
3. Add water, salt & pepper. Cook till done. I pressure cooked it for 3 whistles, can be done in a saucepan too.
4. Let cool a bit and blend smooth, I used my indispensable hand blender. Let cool about 5mins.
5. Add orange juice and serve.
.
Variation:
Ginger can be added for a different flavor.
Combining two power houses of nutrition sure makes for one healthy soup.

Into Green? Then check out my Avocado, Peas and Mint Soup

Thursday, April 3, 2008

Time To Reveal The Mystery Ingredient --- Apple & Apricot Halwa

Apple and Apricot Halwa!
.
I gave it a fancier name by shaping the halwa into apple like figurines - Apple & Apricot Apples, oiii
Many Thanks are in order to all who played along, with their guesses. Pistachio was easily identified by many of you. Rava/Semolina/Sooji got the maximum votes for the main ingredient. The ingredient in the depression of the sweet was guessed as some kind of jam/fruit puree.
Well, no one guessed the right ingredient, Apple!!!
.
It is Apple & Apricot Halwa and uses just a teaspoon of sugar!
This was totally a spur of the moment creation of mine. A pretty jar of bright orange organic apricot preserves sat on my counter top for quite some time. I glanced at it every time I cooked but had to stick to my resolution of not opening it until I finished the other preserves languishing in the refrigerator ;) Yeah, looking at my pantry bursting at it's seams, there were some immediate steps that I needed to take, like displaying some jars on my counter top...lol
Secretly, I wanted to eat spoonfuls right out of that jar, but sense prevailed and I concocted this delicious dish which I'm really very excited and happy about, glad to share it with you all. It's going to be a regular at my place henceforth. The apples from the fruit basket helped me along. I had seen this delicious apple halwa amongst other drool worthy dishes over at Shilpa's and was thinking of trying it and then this idea took shape.......... Apples and apricots go extremely well together.
.
.
3 apples grated ( I used golden del)
1 tsp ghee
1 tbsp milk powder
1 heaped tsp organic raw sugar
1.5 tbsp organic Apricot preserve (I used reduced sugar)
1/4 tsp ground cardamom/elaichi
.
1. Heat ghee. Add grated apples and saute till water evaporates, about 10 minutes.
2. Add milk powder and stir till it all comes together in one mass.
3. Add sugar and let it mix well. The mixture will loosen a bit and then come together again.
4. Add the apricot preserves and cardamom, mix well. Saute a bit and switch off the stove.
5. Let cool a bit and enjoy a guilt free dessert. It is something that can be whipped up in a jiffy. It has a lovely sweet and a lil' tart taste from the apricot which is a pleasure to the senses. You can adjust the sugar as per your taste. If you want it fancier, make small peda/balls out of it, add some preserve in the depression on top of the peda & garnish with Pistachio. Milk powder can be replaced with ground almonds. I'm not sure if my mind was playing games with me, but it tasted just like dudhi/bottle gourd halwa :) Please note that this halwa does not have a cloyingly sweet taste, it is just too delicious!
Enjoy!!
.
p.s. ever tried jack cheese with apricot preserves? sweeeeeeeeet :)
.
.
Have you checked out my Dates & Pistachio Poli

Tuesday, April 1, 2008

G U E S S ------ What Ingredients Make Me So Pretty!!


So, what do you say it is ;)
Lets put the Guess-Meter in over-drive........

Monday, March 31, 2008

F I G and H O N E Y G E L A T O AND Lemongrass Ginger Ale


One of the fruits that I miss dearly from back home is fresh, juicy, luscious fig! The others being guava, custard apple and chikoo! My standard for these fruits is exceptionally high, only because we had these trees at home and nothing can beat the joy of eating a fruit right off the plant ;) Of course, as a kid I never envisioned that these golden moments would become just a distant memory!
Anyway, back to the fig....
The beautiful conglomeration of colors,
the sweet, smooth and plump flesh,
the delicate velvety peel,
the crunch of seeds within.....
what's not to like?
.
So, what do you do if you like something and can't lay your hands on it? Go to the next best alternative is what I did, got the dried ones :) I like the black figs for their gorgeous taste and absolutely breath taking color! Fig Shake makes a regular appearance at my place, could ice cream and gelato be far behind ;)


.
F I G and H O N E Y G E L A T O
a must for fig lovers..........
.
1 heaped cup dry figs chopped fine
1/2 C milk
2-3 tbsp mascarpone cheese
1 tbsp honey
1 tbsp sugar, this is on the lower side (but tastes perfect to me), please adjust as per taste
a pinch sea salt
1/2 tsp orange zest
.
1. To plump up the dry figs, layer finely chopped figs with about 2tbsp water and the sugar that you will be using and let soak 4hrs or overnite. It can be done without soaking too, just takes longer to cook.

2. In a sauce pan heat figs sugar mixture till thick and the figs melt and the mix is bubbly.

3. Remove from heat and stir in milk, honey, orange zest, mascarpone and salt. Chill about 30 mins in the refrigerator and then freeze till set. I just froze it in a steel container with a fitted lid. You can use your ice cream maker if you have one. It froze within an hour on the quick freeze shelf of my refrigerator. If the mix is too coarse, you may blend it as per your liking.

4. For the gelato, the consistency is a little on the smooth side as compared to ice cream. The difference between ice cream and gelato is that cream is not added to the gelato.


5. Enjoy Fig and Honey Gelato, it is quick to make and tastes out of this world ;) So if you are a fig lover, a mascarpone admirer or, what the heck(!) just like to indulge in good food, get to your kitchen and start cooking. If you are at err... work, take a print out and get to it as soon as you reach home, yes it is THAT good :) I would like to submit this to the Tasty Tools event, microplane being the selected tool. Recipe adapted from here.


I'm glad I'm just about to make it for Sig's MBP-Mixed Drinks event with Lemongrass Ginger Ale! Lately I've not been able to get to the events ;)
.
Lemongrass tea is absolutely my favorite kind of tea :) Back home lemongrass used to grow wild in our backyard, now I've to pay dearly to get about 4 stalks of this herb! When I saw this Lemongrass Ginger Ale at Jaden's I knew I had to try it, though it was peak winter!! Try, I did and it was beautiful, just as I had expected. I might have gone a little overboard on the ginger, 'coz that took over the flavor. You can adjust the sugar as per your taste.
.

Enjoy, summer is not too far away........

Wednesday, March 19, 2008

Paneer Broccoli Do Pyaza AND Mix Veg Kootu for Arusuvai

First off, I'm absolutely overwhelmed by your love and response to my Blogiversary post HERE! I'm so very thankful to all of you who left such sweet and wonderful messages for my blog :) I truly appreciate it and loved reading each and everyone of them a few times over ;)
.
Also, a big thanks to my readers who tried my Khasta Kachori and wrote to me how they enjoyed it, was a pleasure hearing from you.

.
Feel free to click on the image for a close up view :).......
.
Now, as a part of the Arusuvai chain I received some lovely gifts from my dear friends and this post is in continuation of that chain. My dear friend Musy sent me a package, I call it 'jadoo ka pitara' aka magic box with endless gifts flowing out...... :) I got some great tasting home made garam masala with an enticing aroma that filled my kitchen and my home! I also got long peppers and a speciality rice & lentils, will discuss them in greater detail in my next post. I did not want to delay this post any longer than I already have, will try to post the next in the series soon. I also got freshly ground kuttu podi from dear Deepa, she ground it the day she sent it to me, can't get any fresh than that :) Accompanying that was a cute card and a choc bar! Thank You ladies for the goodies, had fun preparing these dishes! Sorry, had to say no to a few other friends :(
.
I wanted to prepare something different with the garam masala, so I paired it with my favorite paneer and then added some broccoli for added nutrition...lol
The flavor combination is very different from my daily cooking, I let go of my obsession with garlic for this one and used ginger in a juice form, try it, it sure turned out very good!
.


Paneer Broccoli Do Pyaza
.
1 cup cubed paneer (I used homemade)
1 big onion finely chopped
1/2 cup chopped broccoli
1 tsp grated ginger, to be juiced later
1.5 tbsp ghee/oil
1/2 tsp ajwain/oregano
1/4 tsp garam masala ( if using store bought, you may need to increase it to 1/2 tsp)
1/4 tsp haldi/turmeric
1/4 tsp red chili pwd, as per taste
salt, as per taste
.
1. Steam broccoli fork tender, reserve.
2. Heat ghee/oil.
3. Add ajwain, let splutter a bit.
4. Add onion and saute on medium till soft and pinkish on the edges.
5. Add all spice powders, except garam masala and mix well.
6. Add Paneer and steamed broccoli, mix well. Add juice squeezed from the grated ginger & garam masala, saute a minute, cover and switch off the gas. Allow a few minutes for flavors to mingle.
Enjoy Paneer Broccoli Do Pyaza with roti/paratha and a bowl of chilled yogurt...YUM!
.
.
.
I decided to use the kuttu podi to make a mix veg kootu. I followed Shilpa's recipe for kootu and it turned out amazing, the medley of flavors was wonderful, a coconut lover's delight :)
.
Mixed Vegetable Kootu

1/2 cup toor dal
1 tsp kootu podi
2tbsp coconut
1 cup veg (I used carrot, potato, beans, onion & tomato)
1 tsp oil
1/2 tsp mustard
curry leaves
a pinch hing/asafoetida
a pinch turmeric/haldi
1/4 tsp tamarind extract
1. Boil toor dal and vegetables separately.
2. Grind coconut, tamarind and kootu podi. I added cinnamon & clove as Deepa mentioned that it did not contain these.
3. Add paste to dal and veg, cook 7/8 minutes.
4. Heat oil, add mustard, curry leaves, hing and add to the kootu.
Enjoy delicious Kootu with rice!
.
It was fun using the ingredients, I would now like to extend this friendship chain to Pravs, who cooks up some wonderful dishes over at her blog! Thank You for being a part of this chain, Pravs!